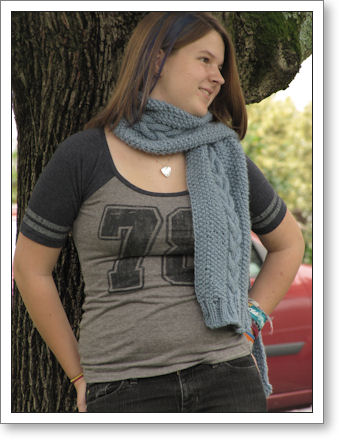
Source: My Own Design (yay!)
Yarn Used: Caron One Pound
Needle Size: U.S. 9
Date Started: July 15, 2011
Date Completed: September 24, 2011
Notes:
(This scarf was knitted as a donation to the Greenleaf Senior Center in Washington, DC.)
Ok, so you know how everything old is new again? Well, it’s kinda that way with this scarf. I didn’t invent anything about this pattern. I just did a sort of knitting mash-up of several things I already know how to do. I bet you do, too. So, let me explain what I did.
The scarf is in three parts. It starts with 8 rows of 2×2 rib, then transitions to a basic seed stitch pattern, with a plaited cable in the center, and ends with 8 rows of ribbing again. All of these stitch patterns can be found in Barbara Walker’s “A Treasury of Knitting Patterns” (the blue one). But I will describe them in my own words, below.
Yarn: Heavy Worsted Weight Yarn. (In my example I used about half a skein of Caron One Pound. Wool would be nicer, but it’s what I had that was washable, which is a requirement for the recipient.)
Needles: I used a size 9 circular needle. In general, use one or two sizes larger than you normally would, so your scarf is a little loose and drapey.
Cable needle
2 stitch markers
2×2 Rib Pattern
Row 1: *K2, P2* across, end K2.
Row 2: Sl first st P-wise, P1. *K2, P2* to last 2 sts. End P1, K1. (this will give you a good selvedge on both sides.)
Row 3: *K2, P2* across, slipping firs stitch p-wise. End K2.
Seed Stitch Pattern
Row 1: *K1, P1* across.
Row 2: Repeat Row 1. (You will be knitting the purls and purling the knits, as they face you.)
Note: Always sl first stitch of every row P-wise.
Cable Panel (worked over 13 sts)
Row 1: P2, K9, P2
Row 2: K2, P9, K2
Row 3: P2, sl next 3 sts to cable needle and hold in front. Knit next 3 sts. Knit 3 sts from cable needle,K3, P2.
Row 4: K2, P9, K2
Row 5: P2, K9, P2
Row 6: K2, P9, K2
Row 7: P2, K3, with cable needle, sl next 3 sts to cable needle and hold in back. Knit next 3 stitches. Knit 3 sts from cable needle. P2.
Row 8: K2, P9, K2
Begin Scarf:
CO 34 stitches. I did the knit-on cast on, but long tail or something similar will do. Knit the Rib pattern for 8 rows (or however many rows suit you… end on row 2 of pattern.)
Seed Stitch/Cable Pattern Setup Row: Follow seed stitch pattern for 11 sts. (your 11th st should be a k.) Place marker, if this helps you. Begin cable panel, P2, K4, M1, K4 P2. (The M1 is very important because it will give you the correct number of sts you will need for the cable pattern.) Place marker. Do seed stitch pattern for remaining 11 stitches, starting and ending with a K stitch. (Note: You will now have 35 stitches on the needle.)
Rows 2 through 8 –Follow cable pattern for center of scarf, and continue the seed stitch on the 11 stitches on either side.
Repeat Rows 1-8 of cable pattern with seed stitch sides until you’ve reached your desired length. End pattern on Row 1, being careful to do a decrease in the center of the cable panel. When you reach the end of the row, you should now have 34 stitches on the needle.
Begin 2×2 rib pattern, starting with Row 2. Continue for 8 rows, ending with Row 1. (This is so the two ribbed ends will match.)
Bind off, and you’re done!
In general, my rule of thumb is to make the scarf as long as the recipient is tall. I made mine about 5 feet because chances are good my recipient will be a wheelchair user.
I hope my instructions are clear. If not, email me at trish@trishknits.com and I will try to help. Happy Knitting!